Programmatic Navigation with NavigationStack #
Programmatic Navigation is triggered programmatically, without waiting for the user to take any action. For example, after processing some data, we can take the user to the result screen.
This is done in SwiftUI by binding the NavigationStack path to the data.
struct ContentView: View {
    @State private var path = [Int]()

    var body: some View {
        NavigationStack(path: $path) {
            VStack {
                // more code to come
            }
            .navigationDestination(for: Int.self) { selection in
                Text("You selected \(selection)")
            }
        }
    }
}
Let’s add two buttons in the // more code to come section;
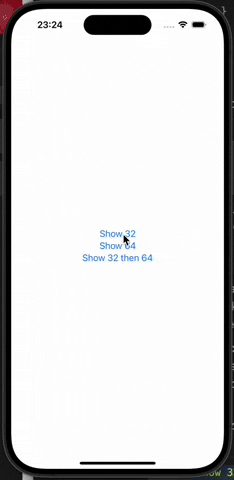
Button("Show 32") {
    path = [32]
}

Button("Show 64") {
    path.append(64)
}
With the first button we modify the whole array to contain only the number 32. If there is anything else in the array it will be removed, so NavigationStack will return to its original state before going to number 32.
With the second button we add the number 64 to the existing array, so this number will be added to what we are navigating to. So, if the array already contains 32, there will now be three views in the stack: The original view (called “root”), then something showing the number 32 and finally something showing the number 64.
You can also push multiple values at the same time, like this;
Button("Show 32 then 64") {
    path = [32, 64]
}
This will present a view for 32 and then a view for 64, so the user has to tap Back twice to go back to the root view.
Working with Different Data Types Using NavigationPath #
Navigation with different data types happens in two ways. The simplest one is when we use different data types using the navigationDestination() method but we don’t follow the path shown exactly, because here things are simple: We can add the navigationDestination() method multiple times, one for each data type we want.
For example, we can show five numbers and five strings and navigate to them differently.
NavigationStack {
    List {
        ForEach(0..<5) { i in
            NavigationLink("Select Number: \(i)", value: i)
        }

        ForEach(0..<5) { i in
            NavigationLink("Select String: \(i)", value: String(i))
        }
    }
    .navigationDestination(for: Int.self) { selection in
        Text("You selected the number \(selection)")
    }
    .navigationDestination(for: String.self) { selection in
        Text("You selected the string \(selection)")
    }
}
However, things get more complicated when we want to add programmatic navigation, because we need to bind some data to the navigation stack path. We have already seen how to bind simple data types to the path variable, but with more complex data types things change a bit.
SwiftUI’s solution is a special type called NavigationPath that can hold various data types in a single path. In practice it works very similar to an array.
We can create a path variable like this;
@State private var path = NavigationPath()Let’s bind to NavigationStack like this;
NavigationStack(path: $path) {For example, let’s show something programmatic with toolbar buttons;
.toolbar {
    Button("Push 556") {
        path.append(556)
    }

    Button("Push Hello") {
        path.append("Hello")
    }
}
How to Go Back to Root View in NavigationStack #
After going a few levels deeper in a NavigationStack, we may want to go back to the beginning. For example, maybe your user is placing an order, and they’ve scrolled through screens showing their cart, asking for shipping information, payment information, then confirming the order, but when they’re done they want to go back to the beginning, back to the root view of the NavigationStack.
To demonstrate this, we can create a small sandbox that pushes new views forever, generating new random numbers each time.
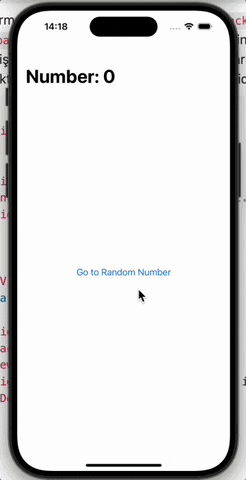
First, let’s create our DetailView with a button that shows its current number as a header and each time it is pressed it goes to a new random number;
struct DetailView: View {
    var number: Int

    var body: some View {
        NavigationLink("Go to Random Number", value: Int.random(in: 1...1000))
            .navigationTitle("Number: \(number)")
    }
}
And now we can present it from our ContentView, it starts with an initial value of 0 but goes to a new DetailView every time a new Int is shown:
struct ContentView: View {
    @State private var path = [Int]()

    var body: some View {
        NavigationStack(path: $path) {
            DetailView(number: 0)
                .navigationDestination(for: Int.self) { i in
                    DetailView(number: i)
                }
        }
    }
}
When you run this, you will see that you can continue to move between views indefinitely.
For example, if you are 10 views deep and you want to go back to root, we have two options;
- If you use a simple array for
pathas we did in the code above, you can callremoveAll()on this array to remove everything inpathand return to the root view. - If you are using
NavigationPathforpath, we can handle this by making a new, empty instance ofNavigationPath. Like this :path = NavigationPath()
But there is a bigger problem: how can we do this from the child view when we don’t have access to the original path property?
We have two options here: store path in an external class that uses @Observable or use a new property wrapper called @Binding. We have already looked at @Observable, so let’s focus on @Binding here.
We saw how @State allows us to create a storage inside the view so that we can change values while our application is running. The @Binding property wrapper allows us to pass a @State property to another view and modify it from there. So we can share the @State property in several places and changing it in one place will change it everywhere.
In our current code this means adding a new property to DetailView to access the navigation path array.
@Binding var path: [Int]And now we need to pass it through both places where DetailView is used in ContentView like this.
DetailView(number: 0, path: $path)
    .navigationDestination(for: Int.self) { i in
        DetailView(number: i, path: $path)
    }
As you can see, we pass the $path variable because we want to do binding. So we want DetailView to be able to read and write path.
And now we can add a toolbar to DetailView to manipulate the path array.
.toolbar {
    Button("Home") {
        path.removeAll()
    }
}
And of course if you use NavigationPath you use this;
.toolbar {
    Button("Home") {
        path = NavigationPath()
    }
}
This way of binding is common. Controls like TextField, Stepper work exactly this way.
How to Save NavigationStack Path Using Codable? #
Using Codable we can save and load the navigation stack path in one of 2 different ways. This choice depends on the type of the path.
- If you are using
NavigationPathto store the active path of ourNavigationStack, SwiftUI provides two helpers to make it easier to save and load your paths. - If you use a homogeneous array, for example
[Int]or[String], you don’t need these helpers and you can freely load or save your data.
The techniques are very similar, so we will cover both here.
Both rely on storing the path outside the view, so that the loading and saving of path data happens invisibly, i.e. an external class handles it automatically. To be more specific, when our path data changes (int, string or NavigationPath object) we need to save the new path so that it is stored in the future and we can restore it from disk when the class is initialized.
Here is how this class will look like when our path data is stored as an Int array;
@Observable
class PathStore {
    var path: [Int] {
        didSet {
            save()
        }
    }

    private let savePath = URL.documentsDirectory.appending(path: "SavedPath")

    init() {
        if let data = try? Data(contentsOf: savePath) {
            if let decoded = try? JSONDecoder().decode([Int].self, from: data) {
                path = decoded
                return
            }
        }

        // Still here? Start with an empty path.
        path = []
    }

    func save() {
        do {
            let data = try JSONEncoder().encode(path)
            try data.write(to: savePath)
        } catch {
            print("Failed to save navigation data")
        }
    }
}
If you use NavigationPath, you only need four small changes.
First, the path property needs to have the type NavigationPath instead of [Int].
var path: NavigationPath {
    didSet {
        save()
    }
}
Secondly, we need to make the necessary change in the initializer where we decode JSON.
if let decoded = try? JSONDecoder().decode(NavigationPath.CodableRepresentation.self, from: data) {
    path = NavigationPath(decoded)
    return
}
Third, if the decode fails, we should assign a new empty NavigationPath instance to the path property at the end of the initializer;
path = NavigationPath()And finally, the save() method should write a Codable representation of the navigation path. Here we need to do a little more than just use a simple array, because NavigationPath does not require the data types to conform to Codable (it only needs them to conform to Hashable). As a result, Swift cannot verify at compile time that the navigation path is a valid representation of Codable, so we need to request it and see what comes back.
This means adding a check at the beginning of the save() method that tries to get the Codable navigation path and immediately aborts if we don’t get a return.
guard let representation = path.codable else { return }This returns data ready to be encoded into JSON, or nil if at least one object in the path cannot be encoded.
Finally, we convert this Codable representation to JSON instead of the original Int array.
This is what the completed class looks like.
@Observable
class PathStore {
    var path: NavigationPath {
        didSet {
            save()
        }
    }

    private let savePath = URL.documentsDirectory.appending(path: "SavedPath")

    init() {
        if let data = try? Data(contentsOf: savePath) {
            if let decoded = try? JSONDecoder().decode(NavigationPath.CodableRepresentation.self, from: data) {
                path = NavigationPath(decoded)
                return
            }
        }

        // Still here? Start with an empty path.
        path = NavigationPath()
    }

    func save() {
        guard let representation = path.codable else { return }

        do {
            let data = try JSONEncoder().encode(representation)
            try data.write(to: savePath)
        } catch {
            print("Failed to save navigation data")
        }
    }
}
Now we can write our SwiftUI code normally and make sure that we bind the path of our NavigationStack to the path property of a PathStore instance. This way we can show views with random integers appended, send as many views as we want, and then quietly restart the application to get it back exactly as we left it.
struct DetailView: View {
    var number: Int

    var body: some View {
        NavigationLink("Go to Random Number", value: Int.random(in: 1...1000))
            .navigationTitle("Number: \(number)")
    }
}

struct ContentView: View {
    @State private var pathStore = PathStore()

    var body: some View {
        NavigationStack(path: $pathStore.path) {
            DetailView(number: 0)
                .navigationDestination(for: Int.self) { i in
                    DetailView(number: i)
                }
        }
    }
}
You can also read this article in Turkish.
Bu yazıyı Türkçe olarak da okuyabilirsiniz.