In this episode, we make BetterRest, our project number 4 in our 100 Days of SwiftUI training, a working application. We will see the implementation of Create ML in real life along with Stepper, DatePicker and Core ML that we learned in the previous chapter.
This project is also available on GitHub.
GitHub - GorkemGuray/BetterRest: 100 Days of SwiftUI - Project-4
Creating the Basic Design #
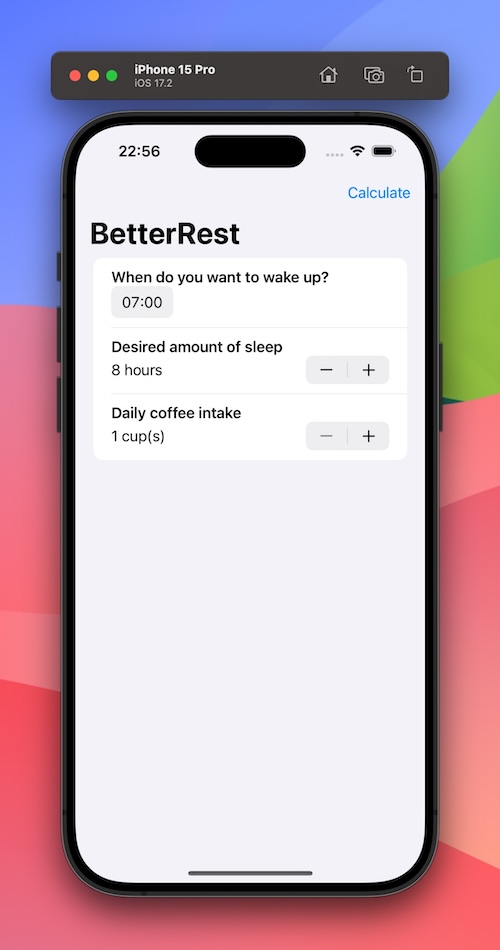
This application will allow user input with a date picker and two steppers. The user will then tell us what time they wake up, how long they want to sleep and how much coffee they drink, and in return we will give the user a suitable bedtime.
Let’s start by adding the three properties to be used in the controls;
@State private var wakeUp = Date.now
@State private var sleepAmount = 8.0
@State private var coffeeAmount = 1
Inside body we will place components wrapped with a VStack and a NavigationStack. Let’s add the following codes;
NavigationStack {
    VStack {
        Text("When do you want to wake up?")
            .font(.headline)

        DatePicker("Please enter a time", selection: $wakeUp, displayedComponents: .hourAndMinute)
            .labelsHidden()

        // more to come
    }
}
We wanted the .hourAndMinute configuration because we care about the time someone wants to wake up, not the day. With the labelHidden() modifier we also hide the label of the picker because the text view is enough.
We will then add a stepper to allow users to choose roughly how much sleep they want. By giving the stepper a range of 4...12 and a step of 0.25, we can make sure they enter sensible values. We can also combine it with the formatted() method so that we see numbers like “8” and not “8.000000”.
Add the following code instead of the comment // more to come.
Text("Desired amount of sleep")
    .font(.headline)

Stepper("\(sleepAmount.formatted()) hours", value: $sleepAmount, in: 4...12, step: 0.25)
Finally, we will add one last stepper and label for how much coffee they drank. This time we will use the range from 1 to 20.
Add them inside VStack, under the previous views;
Text("Daily coffee intake")
    .font(.headline)

Stepper("\(coffeeAmount) cup(s)", value: $coffeeAmount, in: 1...20)
The last thing we need is a button that allows users to calculate the best time to sleep. We could do this with a simple button at the end of the VStack, but I think a button directly in the navigation bar would be better.
Firstly we need a method that the button will call, so add an empty calculateBedtime() method as below;
func calculateBedtime() {
}
Now we need to use the toolbar() modifier to add a button to the navigation bar. While we are here, we can also use navigationTitle() to put a text at the top.
Therefore, add the following modifiers to VStack;
.navigationTitle("BetterRest")
.toolbar {
    Button("Calculate", action: calculateBedtime)
}
Our button will be automatically placed in the top right corner for left to right languages like English, but will automatically move to the other side for right to left languages.
calculateBedtime() won’t do anything yet because it’s empty, but at least our UI is good enough for now.
Connecting Core ML with SwiftUI #
Core ML makes machine learning easier. Once we have a trained model, we can get predictions with just two lines of code.
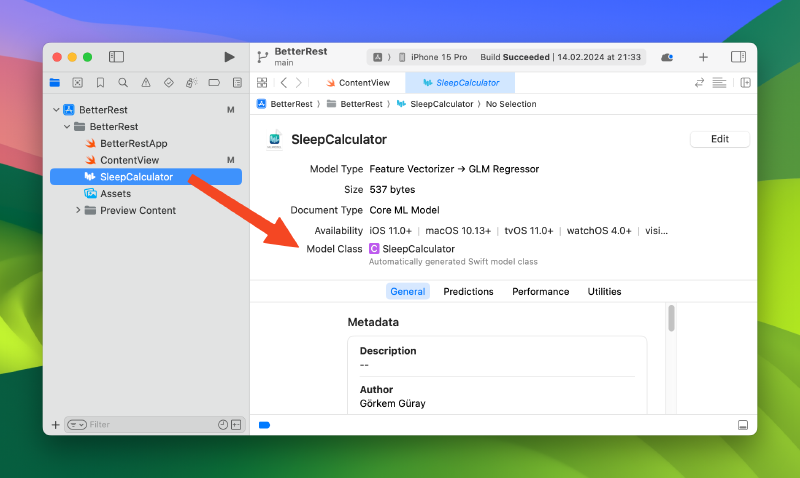
In our case, we have already created a Core ML model using XCode’s Create ML application, so we will use that. Let’s drag the model you created from where you saved it to the project explorer in Xcode.
When we add a .mlmodel file to XCode, it will automatically create a Swift class of the same name. We can’t see the class and we don’t need to, it is automatically generated as part of the build process. However, if our model file is strangely named, it means that the automatically generated class name will also be strangely named.
Whatever the name of our model file, let’s call it SleepCalculator.mlmodel so that the automatically generated class name is SleepCalculator.
How can we be sure that this is the class name? When we select our model file itself, Xcode will show us the file information.
We’ll start populating the calculateBedtime() method in a moment, but before we do that we need to include the CoreML library in our project.
So, go to the top of ContentView.swift and add this before the import line for SwiftUI.
import CoreMLWe do not have an obligation to add CoreML before SwiftUI, we just did it in alphabetical order.
In the calculateBedTime() method, let’s first create an instance of the SleepCalculator class;
do {
    let config = MLModelConfiguration()
    let model = try SleepCalculator(configuration: config)

    // more code here
} catch {
    // something went wrong!
}
This model instance is what reads all our data and outputs a prediction. The configuration is there for the need to interact a few options that are rather vague. Obviously, if you are not working directly in machine learning, you will not need these options very much.
Let’s focus on the do / catch blocks, because using CoreML can fail in two places. During the loading of the model and when we ask for predictions.
We trained our model with a CSV file containing the following fields:
- “wake”: when the user wants to wake up. This is expressed as a number of seconds from midnight. Therefore 8:00 in the morning would be 8x60x60 = 28800.
- “estimatedSleep”: roughly how long the user wants to sleep, stored as values from 4 to 12 in quarterly increments.
- “coffee”: how many cups of coffee the user drinks per day.
Therefore, we need to fill in these values to get a prediction from our model.
Of the properties we created before, sleepAmount and coffeeAmount are good enough, we just need to convert coffeeAmount to integer.
However, finding the wakeup time requires more thought, because the wakeUp property is not a Double representing the number of seconds, but a Date. This is where Swift’s DateComponents come into play. It stores all the parts needed to represent a date as separate values, so we can read the hour and minute components and ignore the rest. Then all we have to do is multiply the minutes by 60 and multiply the hours by 60x60.
We can get DateComponents from Date with the following method call: Calendar.current.dateComponenets() . We can then request the hour and minute components and pass our wakeup date. Since the returned DateComponents instance contains optional data, we will perform an unwrap operation.
Therefore, replace the comment // more code here in calculateBedtime() with the following;
let components = Calendar.current.dateComponents([.hour, .minute], from: wakeUp)
let hour = (components.hour ?? 0) * 60 * 60
let minute = (components.minute ?? 0) * 60
This code uses 0 if hour or minute cannot be read, but in reality this will never happen.
The next step is to feed our values into Core ML and see what comes out. This is done using the prediction() method of our model. This method asks for the values of waking time, estimated sleep and amount of coffee needed to make a prediction, some of these are provided as Int64 values and some as Double values. We have calculated hour and minute in seconds, so we will add them up before sending.
Add the following just below the previous code.
let prediction = try model.prediction(wake: Int64(hour+minute), estimatedSleep: sleepAmount, coffee: Int64(coffeeAmount))

// more code here
prediction now includes how much sleep users need. This is a value dynamically calculated by the Core ML algorithm.
But this is not a useful value for users because it will be a value in seconds. What we want is to convert it to the time they should go to bed. This means that we need to subtract the value in seconds from the time they need to wake up.
Thanks to Apple’s powerful APIs, this is just one line of code. We can extract the value in seconds from a Date and get a new Date. In this case we can add the following code.
let sleepTime = wakeUp - prediction.actualSleepNow we know exactly when they need to sleep. Our last task is to show this to the user. We will do this with an alert.
To show the warning, let’s start by adding the warning title, message and three properties that determine whether to show it or not;
@State private var alertTitle = ""
@State private var alertMessage = ""
@State private var showingAlert = false
We can use these values immediately in calculateBedtime(). If our calculation goes wrong, i.e. reading an estimate gives an error, we can replace the comment // something went wrong with some code that generates a useful error message.
alertTitle = "Error"
alertMessage = "Sorry, there was a problem calculating your bedtime."
We must show the warning regardless of whether the prediction worked or not. It can contain the result of the prediction or an error message. So put the following code at the end of the calculateBedtime() function, i.e. just after the catch block;
showingAlert = trueIf the guess worked, we create a constant called sleepTime containing the time they should go to bed. However, since this is a Date rather than a properly formatted string, we will pass it through the formatted() method to make sure it is human readable, and then assign it to alertMessage.
Therefore, place these last lines of code in the calculateBedtime() method, right after where we set the sleepTime constant;
alertTitle = "Your ideal bedtime is…"
alertMessage = sleepTime.formatted(date: .omitted, time: .shortened)
To complete this stage of the implementation, we just need to add an alert() modifier that shows alertTitle and alertMessage when showingAlert is true.
Let’s add the following modifier to VStack;
.alert(alertTitle, isPresented: $showingAlert) {
    Button("OK") { }
} message: {
    Text(alertMessage)
}
Although our application does not look good, it is working now.
User Interface Improvements #
Although our app is currently working, it’s not in a state where we would want to submit it to the App Store. There is also at least one usability issue.
When we read Date.now, it is automatically set to the current date and time. So, when we create our wakeUp property, the default wakeup time will be whatever time it is now.
While the app should be able to handle any time, a default wake-up time somewhere between 6 and 8 am would be more useful for the majority of users.
To fix this we will add a computed property to the ContentView struct containing a Date value referencing 7am of the current day. We can create our new DateComponents and use Calendar.current.date(from:) to convert them to an exact date.
Now let’s add this property to ContentView;
var defaultWakeTime: Date {
    var components = DateComponents()
    components.hour = 7
    components.minute = 0
    return Calendar.current.date(from: components) ?? .now
}
We can use the newly created computed property instead of Date.now for the default wakeUp value;
@State private var wakeUp = defaultWakeTimeIf you try to compile this code, you will see that it fails. This is because we are accessing one property from inside another. Swift does not know the order in which properties are created, so this is not allowed.
The solution here is simple: we can make defaultWakeTime a static variable, meaning that it belongs to the ContentView struct itself, rather than to a single instance of that struct. This means that defaultWakeTime can be read at any time, because it does not depend on the existence of any other property.
So let’s change the property definition as follows;
static var defaultWakeTime: Date {This solves our usability problem, as most users will find that the default wake-up time is close to what they want to choose.
Now let’s change the user interface a bit. Let’s use a Form instead of VStack. So find the following code;
NavigationStack {
    VStack {
and replace it with this;
NavigationStack {
    Form {
In our form each view is treated as a row in the list, whereas we can get a better view. Here we will wrap each pair of text view and control (DatePicker or Stepper) with VStack, so that each pair will be seen as a single row.
Let’s go ahead and wrap each pair with VStack using .leading for alignment and 0 for spacing. body should look like this;
var body: some View {
        NavigationStack {
            Form {
                VStack(alignment: .leading, spacing: 0) {
                    Text("When do you want to wake up?")
                        .font(.headline)

                    DatePicker("Please enter a time", selection: $wakeUp, displayedComponents: .hourAndMinute)
                        .labelsHidden()
                }

                VStack(alignment:.leading, spacing: 0){
                    Text("Desired amount of sleep")
                        .font(.headline)

                    Stepper("\(sleepAmount.formatted()) hours", value: $sleepAmount, in: 4...12, step: 0.25)
                }

                VStack(alignment: .leading, spacing: 0) {
                    Text("Daily coffee intake")
                        .font(.headline)

                    Stepper("\(coffeeAmount) cup(s)", value: $coffeeAmount, in: 1...20)
                }

            }
            .navigationTitle("BetterRest")
            .toolbar {
                Button("Calculate", action: calculateBedtime)
            }
            .alert(alertTitle, isPresented: $showingAlert) {
                Button("OK") {}
            } message: {
                Text(alertMessage)
            }
        }

    }
The last change we’re going to make is small but magical. Take a look again at this code that shows how many cups of coffee the user drank;
Stepper("\(coffeeAmount) cup(s)", value: $coffeeAmount, in: 1...20)Writing “cup(s)” works, but it is a bit lazy. Ideally we should show “1 cup”, “2 cups”, etc.
We can correct this by using the ternary operator as follows.
Stepper(coffeeAmount == 1 ? "1 cup" : "\(coffeeAmount) cup(s)", value: $coffeeAmount, in: 1...20)But SwiftUI has a better solution. It can handle plural usage for us. Let’s change our code as follows;
Stepper("^[\(coffeeAmount) cup](inflect: true)", value: $coffeeAmount, in: 1...20)This odd syntax is actually a special form of Markdown, a common text format. This syntax tells SwiftUI that the word “cup” should be pulled to match whatever is in the coffeeAmount variable. It will then automatically convert from “cup” to “cups” accordingly.
You can also read this article in Turkish.
Bu yazıyı Türkçe olarak da okuyabilirsiniz.