In this section, we will see List, one of the SwiftUI view types, we will look for an answer to the question of what is App Bundle and we will examine how string operations are done.
What is SwiftUI List? How to use it? #
Of all SwiftUI’s view types, List is the one you trust the most. In UIKit, the equivalent of List was UITableView and it was used in the same way.
The task of List is to provide a scrolling table of data. In fact, it is almost identical to Form except that it is used for data presentation instead of requesting user input.
Just like in Form, we can provide List with a set of static views to be rendered in rows.
List {
    Text("Hello World")
    Text("Hello World")
    Text("Hello World")
}
We can also use ForEach to dynamically create rows from an array and a range.
List {
    ForEach(0..<5) {
        Text("Dynamic row \($0)")
    }
}
More interestingly, we can use a mix of static and dynamic lines.
List {
Text("Static row 1")
Text("Static row 2")
ForEach(0..<5) {
Text("Dynamic row \($0)")
}
Text("Static row 3")
Text("Static row 4")
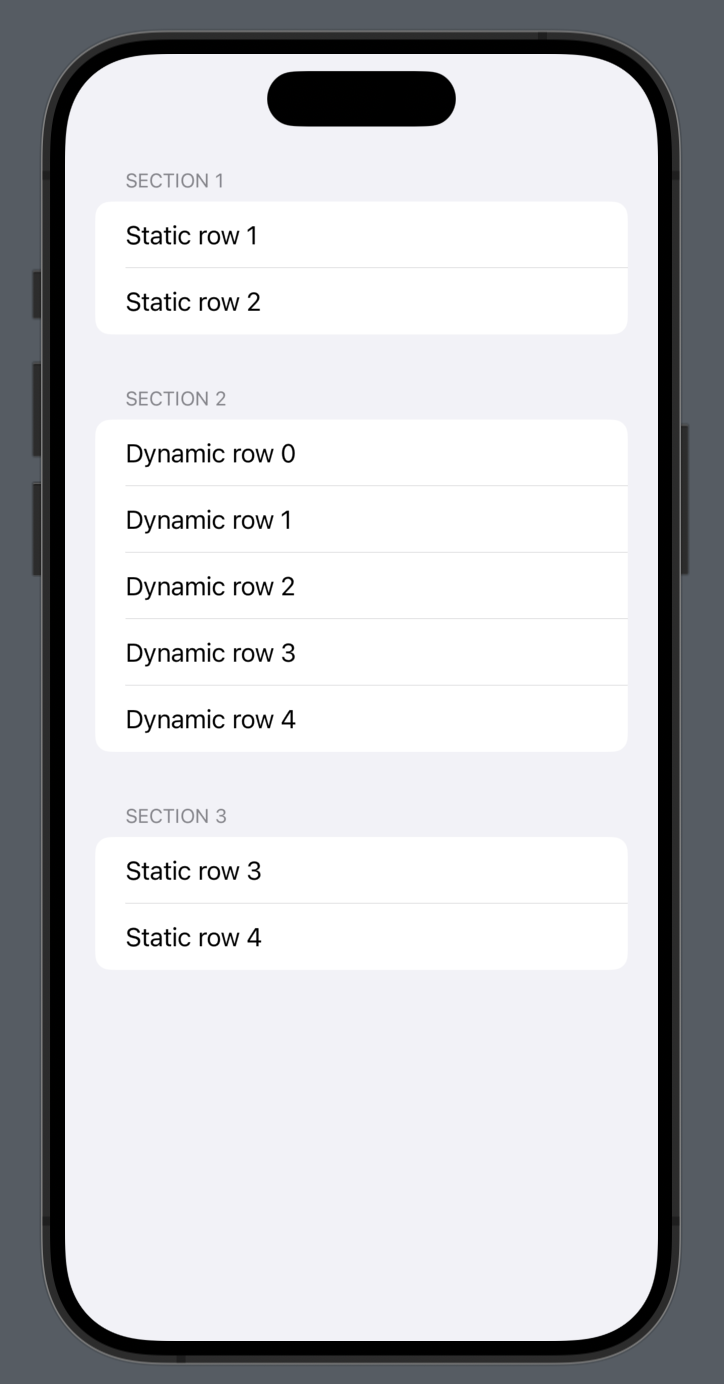
}And of course we can combine it with sections to make our list easier to read.
List {
    Section("Section 1") {
        Text("Static row 1")
        Text("Static row 2")
    }

    Section("Section 2") {
        ForEach(0..<5) {
            Text("Dynamic row \($0)")
        }
    }

    Section("Section 3") {
        Text("Static row 3")
        Text("Static row 4")
    }
}
You will notice that this list looks similar to the form we had before, but using the istStyle() modifier we can adjust how the list looks like as follows.
.listStyle(.grouped)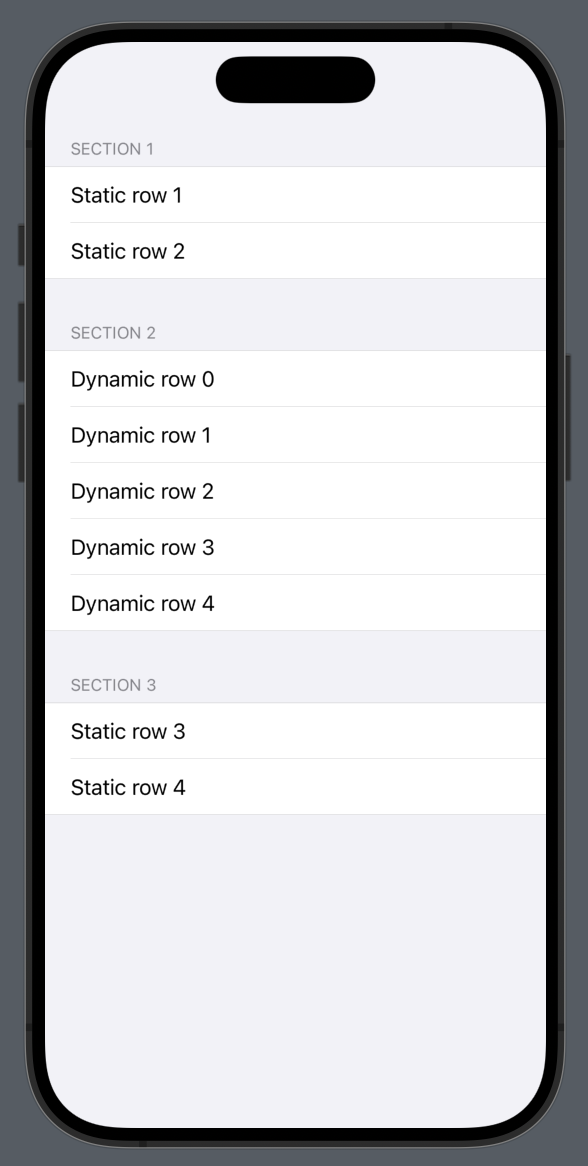
Everything we have seen so far works fine with List as well as Form, even dynamic content. But what List can do and Form can’t is to create its rows entirely from dynamic content without the need for ForEach.
So, if our entire list consists of dynamic rows, we can simply write this;
List(0..<5) {
    Text("Dynamic row \($0)")
}
In this project we will use List a little differently because we will loop over a string array. We used ForEach with intervals (0..<5) hardcoded or (0..<students.count) based on variable data.
Consisting of strings and numbers, the only thing that makes these values unique is the values themselves. So if we have an array of [2, 4, 6, 8, 10], then those numbers themselves are unique identifiers.
When working with this type of list data, id: \.self is used in this way;
struct ContentView: View {
    let people = ["Finn", "Leia", "Luke", "Rey"]

    var body: some View {
        List(people, id: \.self) {
            Text($0)
        }
    }
}
This works in the same way as ForEach, so if we wanted to mix static and dynamic lines, instead of the above code we could write the following;
List {
    Text("Static Row")

    ForEach(people, id: \.self) {
        Text($0)
    }

    Text("Static Row")
}
What is SwiftUI App Bundle? #
When we use Image view, SwiftUI knows to look in our app’s asset catalog to find the image and even automatically adjusts the image so that it loads the correct image for the current screen resolution, @2x or @3x etc.
For other data, such as text files, XML or JSON, we need to do more work.
Xcode creates something called a “bundle” when building our iOS app. This happens on all of Apple’s platforms, including macOS, and allows the system to store all the files for a single app in one place.
In the future, we’ll learn how to include multiple bundles into a single app, allowing us to write things like Siri extensions, iMessage apps, widgets and more in a single iOS app bundle.
When we want to search for a file that we have placed in a package, we use a new data type called URL. In standard terms, this is a URL like https://gorkem.co. But URLs are more powerful than just storing web addresses, they can also store the location of our files.
If we want to read the URL of a file in our main application bundle, we use the Bundle.main.url() method. If the file exists it is sent back to us, otherwise we get back nil, so this is an optional URL. So we need to unwrap it like this;
if let fileURL = Bundle.main.url(forResource: "some-file", withExtension: "txt") {
    // we found the file in our bundle!
}
It doesn’t really matter what’s inside the URL, because iOS uses paths that are impossible to guess. Our app lives in its own sandbox and we shouldn’t try to read outside of it.
Once we have a URL, we can load it into a string with a special initializer: String(contentsOf:) We give it a file URL and if it can be loaded, it returns a string containing the contents of that file. If not, it throws an error, so we need to call it using try or try?;
if let fileContents = try? String(contentsOf: fileURL) {
    // we loaded the file into a string!
}
Once we have the contents of the file, we can do whatever we want with it because it’s just a normal string.
Working with SwiftUI String #
iOS gives us some really powerful APIs for working with strings, like splitting them into an array, removing spaces, and even spell checking. We’ve already looked at some of these, but there are many more.
In this application (Word Scramble) we will load a file from the app bundle containing more than 10,000 eight-letter words to start the game. These words are stored one per line, so what we really want is to split this string into a string array so that we can randomly select one.
Swift String Split #
Swift provides us with a method called components(separatedBy:) that can transform a single string into a string array by breaking it up where another string is located. For example, the following code will create the array ["a", "b", "c"].
let input = "a b c"
let letters = input.components(separatedBy: " ")
We have a string with words separated by line breaks, so we need to split it to convert it into a string array.
In programming we use a special character to represent line breaks: \n So we can write code like this;
let input = """
            a
            b
            c
            """
let letters = input.components(separatedBy: "\n")
No matter which string we split, the result will be a string array. From here, we can read individual values by indexing an array like letters[0] or letters[2], but Swift gives us another useful option: The randomElement() method returns a random element from the array.
For example, the following code will read a random letter from the array;
let letter = letters.randomElement()Swift String Trim #
Another useful string method is trimmingCharacters(in:), which asks Swift to remove certain characters from the beginning and end of an array. This uses a new type called CharacterSet, but most of the time we want a specific behavior: remove spaces and newlines.
This behavior is so common that it is built directly into the CharacterSet structure, so we can ask Swift to trim all spaces at the beginning and end of an array in this way;
let trimmed = letter?.trimmingCharacters(in: .whitespacesAndNewlines)Swift UITextChecker #
There is one last string function that we will examine and that is the ability to check misspelled words.
This capability is provided by the UITextChecker class. You may not realize it, but the “UI” part of this name carries with it two additional meanings;
- This class comes from UIKit. But that doesn’t mean we load all the old UI framewrok, we actually get it automatically through SwiftUI.
- It is written using Objective-C, Apple’s old language. We don’t need to write Objective-C to use it, but there is a somewhat clunky API for Swift users.
Checking a string for misspelled words consists of four steps in total. First, we create a word to check and a UITextChecker instance that we can use to check this string;
let word = "swift"
let checker = UITextChecker()
Second, we need to tell the checker how much of the array we want to check. When we think of a spell check in a word processing application, we only want to check the text that the user has selected, rather than the whole document.
However, there is a problem. Swift uses a very clever, very advanced way of working with arrays. This allows it to use complex characters like emoji in the same way it uses the English alphabet. But Objective-C doesn’t use this method to store letters, which means we have to ask Swift to create an Objective-C string range using the full length of all our characters;
let range = NSRange(location: 0, length: word.utf16.count)UTF-16 is called character encoding. We use it here so that Objective-C can understand how Swift stores its strings; it’s a nice bridge format to connect the two.
Third, we can ask the checker to tell us where it finds typos in our word, giving it a range to check, a position to start from within the range (so that we can do things like “Find Next”), whether to return to the beginning when it reaches the end, and what language to use for the dictionary;
let misspelledRange = checker.rangeOfMisspelledWord(in: word, range: range, startingAt: 0, wrap: false, language: "en")This sends another Objective-C string range that tells us where the misspelling was found. Objective-C had no concept of optional, instead relying on special values to represent missing data.
In this case, if the Objective-C range returns empty (i.e. there are no typos because the string is typed correctly) then we get back the special value NSNotFound.
So, this is how we can check our typing result to see if there is an error;
let allGood = misspelledRange.location == NSNotFoundYou can also read this article in Turkish.
Bu yazıyı Türkçe olarak da okuyabilirsiniz.