

How to Install EtherCAT ESI (XML) Files in Sysmac Studio
A complete step-by-step guide to installing and troubleshooting third-party EtherCAT Slave Information (ESI XML) device profiles in Omron Sysmac Studio.
An EtherCAT ESI (EtherCAT Slave Information) file is a vendor-supplied XML device profile required to integrate third-party couplers, servo drives, sensors, and remote I/O into an Omron NJ/NX machine controller via Sysmac Studio. While native Omron devices are pre-installed, non-Omron devices must be imported into the Sysmac Studio master library before configuring process data object (PDO) mapping and distributed clock (DC) synchronization.
Hardware and Software Specifications
| Specification | Supported Standard / Value | Notes |
|---|---|---|
| Controller Compatibility | Omron NJ101, NJ301, NJ501, NX102, NX1P2 | All EtherCAT Master enabled MACs |
| Engineering Software | Sysmac Studio v1.20 or newer | Standard / Professional editions |
| Network Protocol | EtherCAT (IEC 61158 Type 12) | 100BASE-TX full-duplex (100 Mbps) |
| File Format | XML (EtherCAT Slave Information - ETG.2000) | Strictly validated against schema |
| Third-Party Devices | Remote I/O, VFDs, valve terminals, encoders, gateways | ODOT, Beckhoff, Festo, SMC, WAGO, etc. |
Native Omron EtherCAT devices (such as NX slice I/O, 1S and G5 servo drives, and FH vision systems) are already integrated within Sysmac Studio out of the box:
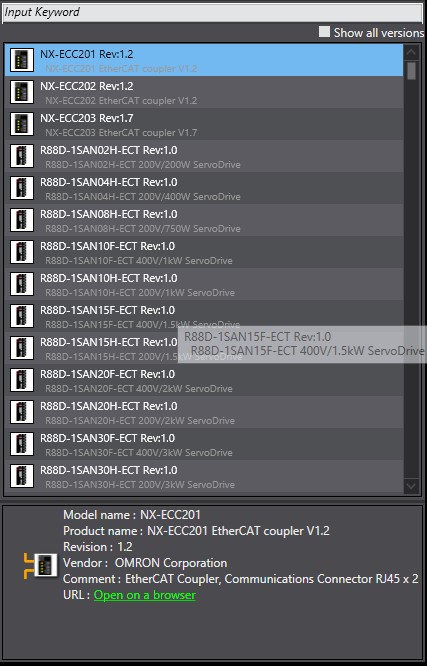
When integrating non-Omron components into your motion and logic architecture, you must acquire and install the corresponding device manufacturer’s ESI XML file.
Obtaining the Correct ESI File
To integrate a third-party slave into Sysmac Studio, obtain the official ESI file directly from:
- The hardware manufacturer’s official support or downloads portal.
- Media supplied with the unit (USB drive or documentation CD).
- Contacting the manufacturer’s technical support department.
In this walkthrough, we integrate the ODOT CN-8033 EtherCAT Network Coupler (downloadable from ODOT Automation).
Step-by-Step: Installing the ESI File in Sysmac Studio
Follow these steps to import the third-party slave into your engineering environment:
Step 1: Extract the XML File
Manufacturers typically distribute ESI files inside .zip archives. Extract the archive to access the raw .xml file (e.g., XML-ODOT-CN8033-V1.22-20230201.xml).
Step 2: Prepare Sysmac Studio
Open your target project or create a new project in Sysmac Studio.
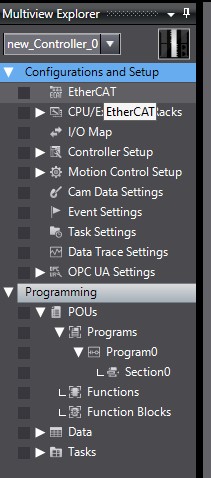
Step 3: Open the EtherCAT Configuration View
In the Multiview Explorer pane on the left, navigate to: Configurations and Setup → EtherCAT.
Double-click on the EtherCAT node to open the graphical topology editor:
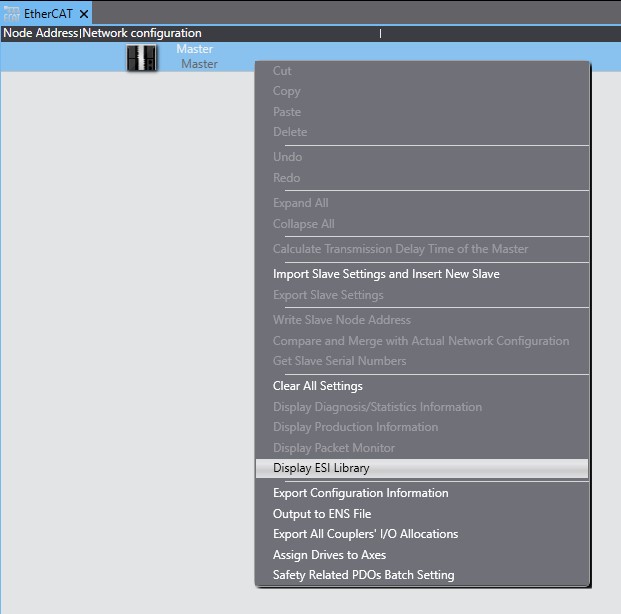
Step 4: Open the ESI Library Window
In the main workspace, locate the Master icon at the top of the tree. Right-click on Master and select Display ESI Library:
Step 5: Install the File
In the ESI Library management dialog:
- Click the Install (File) button.
- Browse to the extracted
.xmlfile on your filesystem and click Open.
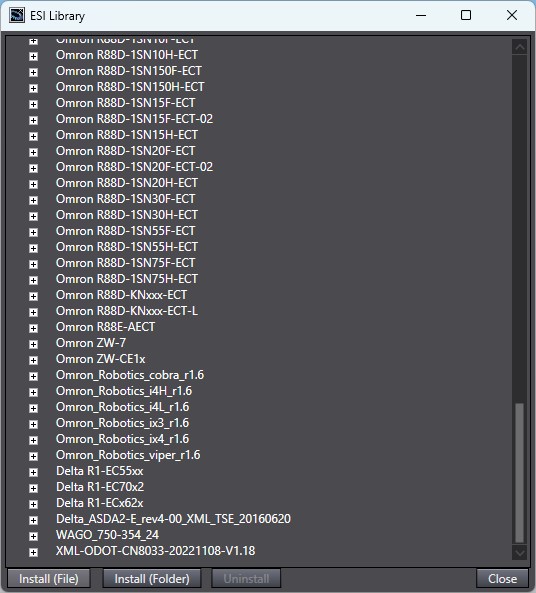
Step 6: Reload and Verify in Toolbox
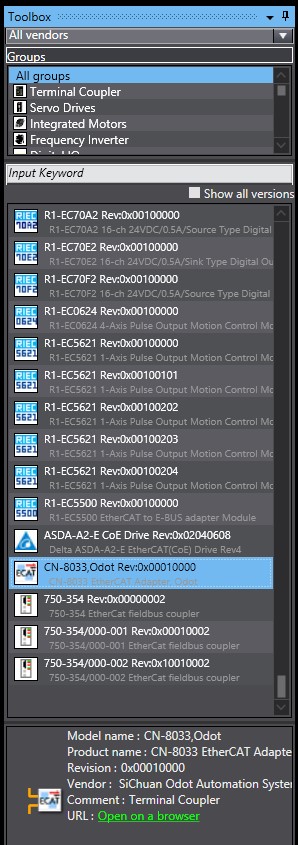
Once the file import is confirmed, close the ESI Library window. Sysmac Studio will take a few seconds to parse the XML, validate vendor IDs, and index the PDO dictionaries.
In the Toolbox panel on the right side of the screen, expand the manufacturer’s category (e.g., ODOT Automation or Communications Coupler). You can now drag and drop the newly installed slave onto the EtherCAT network tree:
Field Notes & Commissioning Tips (“Saha Notu”)
Practical engineering tips learned from factory floor deployments:
- Offline vs. Online Comparison: Once the ESI file is installed and you connect physically to the machine, right-click the EtherCAT Master and run Compare and Merge with Physical Network Configuration. This verifies that node addresses, vendor codes, and cable link topologies match your software project.
- Handling XML Parse Errors: If Sysmac Studio rejects an ESI file, open the XML in a code editor. Check for illegal characters or missing closing tags. Omron strictly requires ETG.2000 compliant schema.
- Library Persistence: Installed ESI files persist across projects on the workstation. However, when archiving or sharing a project (
.smc2) with another engineer, they must also have the same ESI files installed on their workstation, or you should export an environment package. - Diagnostic Codes: If the slave shows an initialization fault during PLC startup, cross-check the master error code (such as
0x04C0or0x8460) with the Omron Sysmac Error Code Lookup tool.
Related Guides
Frequently Asked Questions
What is an EtherCAT ESI file in Sysmac Studio?
An ESI (EtherCAT Slave Information) file is an XML-formatted device profile provided by hardware manufacturers. It defines process data objects (PDOs), service data objects (SDOs), distributed clocks (DC) sync settings, and hardware revisions so the Omron master controller can communicate with third-party devices.
Where are ESI files stored in Sysmac Studio?
Installed ESI files are stored locally in the Sysmac Studio device library database and system directory. Once imported through the Display ESI Library interface, devices permanently appear in the Toolbox for all current and future projects.
Why does Sysmac Studio give an error when installing an ESI file?
Common errors stem from having multiple Sysmac Studio instances open simultaneously (locking the library SQLite/XML database), XML schema validation mismatches against the ETG standard, or duplicate vendor/product revision IDs.
Do Omron EtherCAT slaves need external ESI files?
No. All native Omron EtherCAT devices (NX-series I/O, 1S and G5 servo drives, MX2/RX2 inverters, vision sensors) are pre-installed and embedded in the Sysmac Studio device library.