Today we will learn how to delete SwiftData objects, how to sort queries using SortDescriptor and how to add custom buttons to alerts.
The topics we will work on today;
- Show book details
- Sorting SwiftData Query with SortDescriptor
- Delete SwiftData Query
- NavigationLink with SwiftUI Alert
Show Book Details #
When the user taps a book in the ContentView, we will present a detail view with more information - the type of book, a short review, and more. We will also reuse our new RatingView and even customize it so you can see how flexible SwiftUI is.
To make this screen more interesting, we will add some images representing each category in our app. I selected some illustrations from Unsplash and placed them in the project11-files folder. Download these files and add them to the asset catalog.
Next, create a new SwiftUI View called “DetailView” and import SwiftData. This new view only needs one property, which is the book it should display, so please add it now;
let book: BookJust having this property is enough to break the preview code of DetailView.swift. Before it was easy to fix this because we were just sending a sample object, but with SwiftData things got more complicated.
This is the first thing that is really hard in SwiftData; we need to get everything exactly right for it to work;
- To create a sample
Bookobject, we first need to create a model context. - This model context requires creating a model container.
- If we create a model container, we don’t actually want it to store anything, so we can create a custom configuration that tells SwiftData to store its information only in memory. This means that everything is temporary.
I know this sounds like a lot, but in practice it’s just a few lines of code. We need to create a model container and do it using a new type called ModelConfiguration that allows us to request temporary memory. Once we have done that, we can create a Book object in the normal way and then send it to the DetailView along with the model container itself.
Replace your existing preview code with this one;
#Preview {
    do {
        let config = ModelConfiguration(isStoredInMemoryOnly: true)
        let container = try ModelContainer(for: Book.self, configurations: config)
        let example = Book(title: "Test Book", author: "Test Author", genre: "Fantasy", review: "This was a great book; I really enjoyed it.", rating: 4)

        return DetailView(book: example)
            .modelContainer(container)
    } catch {
        return Text("Failed to create preview: \(error.localizedDescription)")
    }
}
Trying to create a SwiftData model object without a container will probably cause your code to crash.
Having done that, we can turn your attention to the more interesting problem of designing the new view itself. To start with, we’ll place the category image and type in a ZStack so that we can nicely lay one on top of the other. I chose the base styles that I thought looked good, but you can experiment with the styles however you like, just keep the ScrollView.
Replace the current body property with this one.
ScrollView {
    ZStack(alignment: .bottomTrailing) {
        Image(book.genre)
            .resizable()
            .scaledToFit()

        Text(book.genre.uppercased())
            .font(.caption)
            .fontWeight(.black)
            .padding(8)
            .foregroundStyle(.white)
            .background(.black.opacity(0.75))
            .clipShape(.capsule)
            .offset(x: -5, y: -5)
    }
}
.navigationTitle(book.title)
.navigationBarTitleDisplayMode(.inline)
.scrollBounceBehavior(.basedOnSize)
This places the genre name in the bottom right corner of the ZStack, with a background color, bold font and some padding to help it stand out.
Below this ZStack we will add the author, review and rating. We don’t want users to be able to set the rating here, instead we can use another constant binding to turn this into a simple read-only view. Even better, since we are using SF Symbols to create the rating view, we can scale them seamlessly with a simple font() modifier to better utilize all the space we have.
So add these views directly under the previous ZStack;
Text(book.author)
    .font(.title)
    .foregroundStyle(.secondary)

Text(book.review)
    .padding()

RatingView(rating: .constant(book.rating))
    .font(.largeTitle)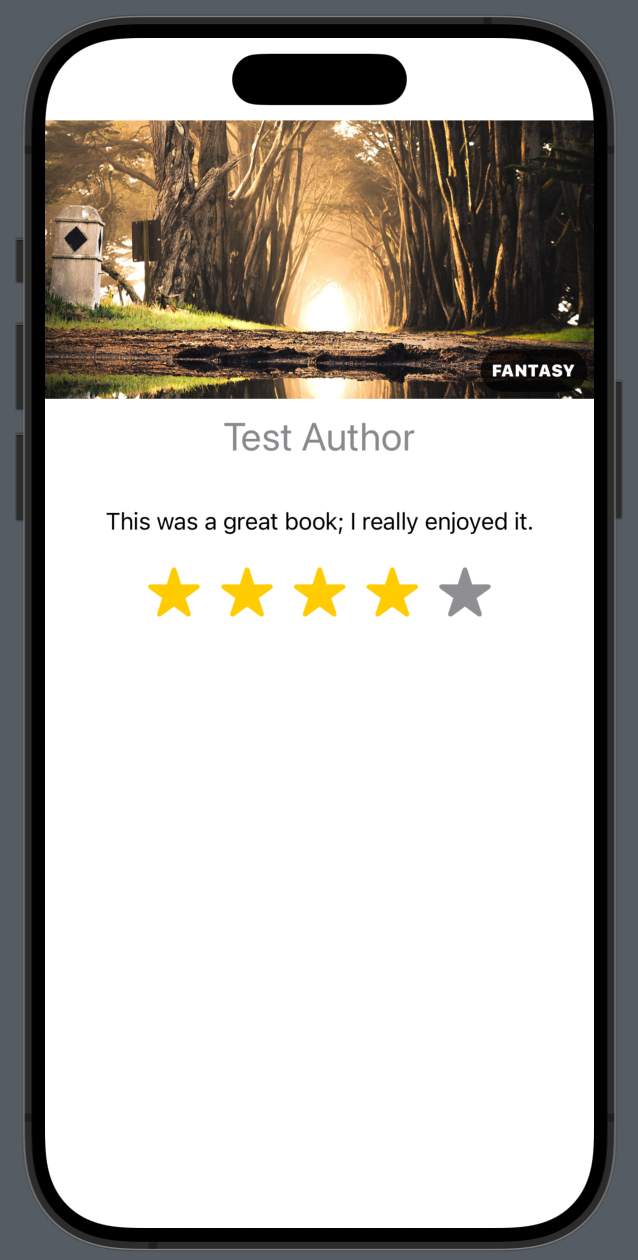
Now that DetailView is complete, we can go back to ContentView.swift to add a navigation destination to the List view;
.navigationDestination(for: Book.self) { book in
    DetailView(book: book)
}
Now run the app again, because you should be able to tap on any of the books you entered to show them in the new detail view.
Sorting SwiftData Query with SortDescriptor #
When you use @Query to pull objects from SwiftData, you can specify how you want the data to be sorted. For example alphabetically or numerically with the highest numbers first? Whatever you choose, it’s always a good idea to choose something so that your users have a predictable experience.
In this project, we have several fields that can be useful for ranking purposes: the book’s title, author or rating would be logical and good choices, but we don’t have to rely on just one - you can specify more than one, so you can ask for the highest rated books first, then use their name as a tiebreaker.
Query ranking can be done in two ways: with a simple option that allows only one sort field, or with a more advanced type that allows an array of a new type called SortDescriptor.
Using the simple version, we might want our books to be provided in alphabetical order by title;
@Query(sort: \Book.title) var books: [Book]Or we can ask them to rank them from highest to lowest according to the rating;
@Query(sort: \Book.rating, order: .reverse) var books: [Book]This works when you want a single field, but I would say it’s usually a better idea to have a spare field, saying “sort by rating, then by title” adds an extra level of predictability to your application, which is always a good thing.
This is done using the SortDescriptor type, which we can create from one or two values: the property we want to sort on and optionally whether it should be reversed. For example, on the title property we can sort alphabetically like this;
@Query(sort: [SortDescriptor(\Book.title)]) var books: [Book]Sorting results using SortDescriptor is by default done in ascending order, i.e. alphabetical order is used for text, but if you want to reverse the sort order you do the following instead;
@Query(sort: [SortDescriptor(\Book.title, order: .reverse)]) var books: [Book]You can specify more than one Sort Descriptor and they will be applied in the order you provide. For example, if the user added Pete Hamill’s “Forever” and then added Judy Blume’s “Forever”, then it would be useful to specify a second sort field.
Therefore, we might want the book title to be sorted ascending first, followed by the book author ascending second;
@Query(sort: [
    SortDescriptor(\Book.title),
    SortDescriptor(\Book.author)
]) var books: [Book]
Unless you have a lot of data with similar values, having a second or third sort field has little or no impact on performance. For example, in our books data, almost every book will have a unique title, so having a secondary sort field is more or less irrelevant for performance.
Delete SwiftData Query #
We’ve already used @Query to place SwiftData objects into a SwiftUI List, and with just a little more work we can enable both scrolling to delete and a special Edit/Done button.
Just like with normal data arrays, most of the work is done by adding an onDelete(perform:) modifier to ForEach, but instead of just removing items from an array, we need to find the desired object in the query and then use it to call the delete() method in the model context. Once all objects are deleted, SwiftData’s autosave system will kick in and apply the changes permanently.
So, start by adding this method to ContentView;
func deleteBooks(at offsets: IndexSet) {
    for offset in offsets {
        // find this book in our query
        let book = books[offset]

        // delete it from the context
        modelContext.delete(book)
    }
}
We can trigger this by adding an onDelete(perform:) modifier to ForEach of ContentView, but remember: ForEach and not List.
Add this modifier now;
.onDelete(perform: deleteBooks)This allows us to scroll to delete. We can also go one step further by adding an Edit/Done button. Find the toolbar() modifier in ContentView and add another ToolbarItem;
ToolbarItem(placement: .topBarLeading) {
    EditButton()
}
Now you can run the app and delete the books you added earlier.
NavigationLink with SwiftUI Alert #
We have already seen how NavigationLink allows us to switch to a detail view like custom view, Text or Image. Since we are in a NavigationStack, iOS automatically provides a Back button to allow users to go back to the previous screen, and they can also swipe from the edge to go back. However, it is sometimes useful to return programmatically, that is, to return to the previous screen when we want to, rather than when the user swipes.
We will add a final feature to our application that deletes the book the user is currently looking at. To do this we need to show a warning asking the user if they really want to delete the book, then if they do, delete the book from the current model context. Once this is done, there is no point in staying on the current screen as the associated book no longer exists, so we will discard the current view - NavigationStack from the top of the stack, thus returning to the previous screen.
First, we need three new properties in the DetailView struct: one to hold the SwiftData model context (so we can delete things), one to hold our dismiss action (so we can remove the view from the navigation stack), and one to control whether we show the delete confirmation warning.
So, start by adding these three new properties to DetailView;
@Environment(\.modelContext) var modelContext
@Environment(\.dismiss) var dismiss
@State private var showingDeleteAlert = false
The second step is to write a method that removes the current book from the model context and closes the current view. It doesn’t matter if this view is shown using a navigation link instead of a sheet - we still use the same dismiss() code.
Add this method to DetailView now;
func deleteBook() {
    modelContext.delete(book)
    dismiss()
}
The third step is to add an alert() modifier that follows showingDeleteAlert and asks the user to confirm the action. So far we have used a close button with simple alerts, but here we need two buttons. One to delete the book and one to cancel it. Both of these have specific button roles that automatically make them look right, so we’ll use them.
Apple offers very clear guidance on how we should label warning text, but it comes down to this: “OK” is fine if it’s a simple “I understand” acceptance, but if you want users to make a choice you should avoid titles like “Yes” and “No” and instead use verbs like “Ignore”, “Reply” and “Confirm”.
In this example, we will use “Delete” for the destructive button, then provide a “Cancel” button next to it so that users can opt out of the deletion if they wish. So, add this modifier to ScrollView in DetailView;
.alert("Delete book", isPresented: $showingDeleteAlert) {
    Button("Delete", role: .destructive, action: deleteBook)
    Button("Cancel", role: .cancel) { }
} message: {
    Text("Are you sure?")
}
The last step is to add a toolbar item that initiates the deletion - this only needs to toggle the showingDeleteAlert boolean, because our alert() modifier is already following it. Add this last modifier to the ScrollView;
.toolbar {
    Button("Delete this book", systemImage: "trash") {
        showingDeleteAlert = true
    }
}
Now you can either scroll to delete books in the ContentView and use the edit button to delete them, or you can go to the DetailView and tap the special delete button there.
You can also read this article in Turkish.
Bu yazıyı Türkçe olarak da okuyabilirsiniz.