

How to Create and Use Swift Protocol? #
Protocol is similar to contracts in Swift. It allows us to define what kind of functions we expect a data type to support, so we can follow those rules in the rest of our code.
Let’s consider a code to simulate a commuter. We can create a Car struct and then write the following method.
func commute(distance: Int, using vehicle: Car) {
    // some codes....
}
He might also use the train to get to work.
func commute(distance: Int, using vehicle: Train) {
    // some codes....
}
He could be driving on the bus.
func commute(distance: Int, using vehicle: Bus) {
    // some codes....
}
or he may be riding a bicycle, scooter, etc.
In fact, we are not interested in the means by which the journey takes place. What we care about is how long it takes and which vehicle is used.
This is where protocols come in: they allow us to define the properties and methods we want to use. They don’t implement these properties and methods, they just tell us that the properties and methods must exist.
For example, we can define the Vehicle protocol as follows.
protocol Vehicle {
    func estimateTime(for distance: Int) -> Int
    func travel(distance: Int)
}
Let’s analyze the code above a bit;
- To create a protocol we type
protocoland then give the name protocol. Since this is a new type, we need to use Camel case, which starts with a capital letter. - Inside the protocol, we list all the methods we need for the protocol to work as expected.
- These methods don’t have any code inside them, i.e. they don’t contain the body of the function. Instead, we specify the method names, parameters and return types.
- We can mark methods as
throwingandmutatingif necessary.
How to Use Protocol #
We can now design types that work with this protocol. This allows us to create new structs, classes or enums that implement the requirements of that protocol. This process is called adopting or conforming.
The Protocol does not specify all the functionality that must exist, only a minimum level of functionality. When we create new types that conform to the Protocol, it means that we can add properties and methods beyond the requirements.
For example, we can create a Car struct compatible with the Vehicle protocol as follows.
struct Car: Vehicle {
    func estimateTime(for distance: Int) -> Int {
        distance / 50
    }

    func travel(distance: Int) {
        print("I'm driving \(distance)km.")
    }

    func openSunroof() {
        print("It's a nice day!")
    }
}
Let’s examine the code above;
- Just like we do with child classes, we use a
:colon after the nameCarto tell Swift thatCaris conformed toVehicle. - All the methods listed in the
Vehicleprotocol must be the same in theCarstruct. If they have different names, accept different parameters, have different return types, Swift will say that we are not conforming to the protocol. - The methods in
Carensure that the methods we specify in the protocol are actually implemented. openSunroof()does not come from the protocol. As we have already mentioned,Carhas implemented all the methods required by the struct protocol, and can add its own extra method.
Let’s update our previous commute() function with the latest developments.
func commute(distance: Int, using vehicle: Car) {
    if vehicle.estimateTime(for: distance) > 100 {
        print("That's too slow! I'll try a different vehicle.")
    } else {
        vehicle.travel(distance: distance)
    }
}

let car = Car()
commute(distance: 100, using: car)

//OUTPUT:
//----------------------------------------
// I'm driving 100km.
All of this code works, but the protocol didn’t add any value. Yes, it allowed us to implement two custom methods inside Car, but we could have done that without adding the protocol, so why bother?
Here’s the trick with protocols: Swift knows that a type that conforms to the Vehicle protocol must implement both the estimateTime() and travel() methods, and therefore allows us to use Vehicle instead of Car as the type of our parameter. We can rewrite the commute() function as follows.
func commute(distance: Int, using vehicle: Vehicle) {Now we say that this function can be called with any data type as long as it conforms to the Vehicle protocol. The body of the function does not need to be modified.
Now let’s continue developing our code;
struct Bicycle: Vehicle {
    func estimateTime(for distance: Int) -> Int {
        distance / 10
    }

    func travel(distance: Int) {
        print("I'm cycling \(distance)km.")
    }
}

let bike = Bicycle()
commute(distance: 50, using: bike)

//OUTPUT:
//----------------------------------------
// I'm cycling 50km.
Now we have a second struct compatible with Vehicle and this is where the power of protocols comes in. We can now pass a Car or Bicycle as a parameter to the commute() function. When either estimateTime() or travel() is called, Swift will automatically use the appropriate one.
So protocols allow us to talk about the type of functionality instead of specifying the exact type. Instead of saying “This parameter must be a car” we can say “This parameter can be anything as long as it can estimate the travel time and move to a new location”.
In addition to protocols and methods, we can also specify properties that must be present. To do this, type var, the name of the property, then specify that the property is readable and/or writable.
Let’s add some properties to the existing Vehicle protocol.
protocol Vehicle {
    var name: String { get }
    var currentPassengers: Int { get set }
    func estimateTime(for distance: Int) -> Int
    func travel(distance: Int)
}
This adds two features;
- A String named
namewhich must be readable. This could mean that it is a constant, but it could also be a computed property calculated with a getter. - An integer named
currentPassengersthat is both readable and writable. This could mean that it is a variable, but it could also be a property computed with getter and setter.
Type annotation applies to both property definitions. Because in protocol we cannot provide a default value, just like in protocol we cannot provide a function body for methods.
With the two properties we added in the protocol, we will get an error because these properties are missing in the Car and Bicycle structs. To fix this, let’s add the following to the Car struct.
let name = "Car"
var currentPassengers = 1
Let’s add the following to the Bicycle struct;
let name = "Bicycle"
var currentPassengers = 1
Now, according to our protocol, every structure that implements our protocol must have two methods and two properties. This way we can write our code making sure that these functionalities are present.
func getTravelEstimates(using vehicles: [Vehicle], distance: Int) {
    for vehicle in vehicles {
        let estimate = vehicle.estimateTime(for: distance)
        print("\(vehicle.name): \(estimate) hours to travel \(distance)km")
    }
}
This shows the power of protocols. We accept the Vehicle protocol as an Array. This means that we can pass in any structure that implements the Vehicle protocol and it will work automatically.
getTravelEstimates(using: [car, bike], distance: 150)

//OUTPUT:
//----------------------------------------
// Car: 3 hours to travel 150km
// Bicycle: 15 hours to travel 150km
In addition to accepting protocols as parameters, we can also return protocols from a function if needed.
We can follow as many protocols as we want, just separated by commas. So we are not limited to one protocol.
Also, if we need to create a child class of something and follow a protocol, we need to write the name of the parent class first and then write our protocol.
The code examples given in this section are as follows.
import Cocoa

protocol Vehicle {
    var name: String { get }
    var currentPassengers: Int { get set }
    func estimateTime(for distance: Int) -> Int
    func travel(distance: Int)
}

struct Car: Vehicle {
    let name = "Car"
    var currentPassengers = 1

    func estimateTime(for distance: Int) -> Int {
        distance / 50
    }

    func travel(distance: Int) {
        print("I'm driving \(distance)km.")
    }

    func openSunroof() {
        print("It's a nice day!")
    }
}

struct Bicycle: Vehicle {
    let name = "Bicycle"
    var currentPassengers = 1

    func estimateTime(for distance: Int) -> Int {
        distance / 10
    }

    func travel(distance: Int) {
        print("I'm cycling \(distance)km.")
    }
}

func commute(distance: Int, using vehicle: Vehicle) {
    if vehicle.estimateTime(for: distance) > 100 {
        print("That's too slow! I'll try a different vehicle.")
    } else {
        vehicle.travel(distance: distance)
    }
}

func getTravelEstimates(using vehicles: [Vehicle], distance: Int) {
    for vehicle in vehicles {
        let estimate = vehicle.estimateTime(for: distance)
        print("\(vehicle.name): \(estimate) hours to travel \(distance)km")
    }
}

let car = Car()
commute(distance: 100, using: car)

let bike = Bicycle()
commute(distance: 50, using: bike)

getTravelEstimates(using: [car, bike], distance: 150)
What is Opaque Return Type? How to use it? #
Assume we have two simple functions;
func getRandomNumber() -> Int {
    Int.random(in: 1...6)
}

func getRandomBool() -> Bool {
    Bool.random()
}
getRandomNumber() returns a random integer and getRandomBool() returns a random Boolean.
Both Int and Bool conform to a common Swift protocol called Equatable, which means “comparable for equality”. The Equatable protocol is what allows us to use the expression ==.
print(getRandomNumber() == getRandomNumber())Since both of these types are compatible with Equatable, we can modify our function to return Equatable.
func getRandomNumber() -> Equatable {
    Int.random(in: 1...6)
}

func getRandomBool() -> Equatable {
    Bool.random()
}
However, at this point the code will not work and Swift will give an error message: “protocol ‘Equatable’ can only be used as a generic constraint because it has Self or associated type requirements”. This error means that it doesn’t make sense to return Equatable and understanding why it doesn’t make sense is the key to understanding Opaq Return Type.
First, we can return a protocol from the function.
For example, we could have a function that finds rental cars for users. This function can accept parameters like number of passengers and number of luggage and return one of several structs; Compact, SUV, Minivan
We can handle this by returning the Vehicle protocol adopted by all these structs. So instead of writing 10 different functions to handle all the vehicle types, the function caller will get back a vehicle that matches their request. Each of these vehicle types will implement all methods and properties of Vehicle, which means they can be used interchangeably - coding-wise we don’t care which options we get back.
Now let’s consider sending back an Int or a Bool. Yes, they both conform to Equatable, but they cannot be used interchangeably (we cannot use == to compare an Int and a Bool). Because Swift doesn’t allow us to, regardless of which protocol they conform to.
Returning a protocol from a function is useful because it allows us to hide information. Instead of specifying the exact type returned, we can focus on the functionality returned. In the case of a Vehicle protocol, this means reporting back the number of seats, approximate fuel usage and a price. This means we can change our code later without breaking things. We can return a RaceCar or a PickUpTruck as long as they implement the properties and methods required by Vehicle.
Hiding information in this way is really useful, but not possible with Equatable. Because even if we call getRandomNumber() twice to get two integers, we cannot compare them because we have hidden the exact data types (we have hidden the fact that there are really two integers that can be compared).
This is where Opaque return types come into play, allowing us to not hide the information in our code from the Swift compiler. This way we can make our code more flexible, we can return different things in the future, but Swift will always understand the actual data type returned and check it appropriately.
To upgrade our two functions to opaque return type, let’s add the keyword some before the return type.
func getRandomNumber() -> some Equatable {
    Int.random(in: 1...6)
}

func getRandomBool() -> some Equatable {
    Bool.random()
}
Now we can call getRandomNumber() twice and compare the results using ==. From our point of view we still only have Equatable, but behind the scenes Swift knows that these are actually two integers.
Returning Opaque return type means that we can focus on functionality instead of returning a specific type. So in the future we can change our code to Double.random(in:) and still see that our code works great.
But the advantage here is that Swift always knows the actual underlying data type. This is a subtle distinction. Returning just Vehicle means “any type of Vehicle but we don’t know what it is”, while returning some Vehicle means “some type of Vehicle but we don’t want to say which one it is”.
For example, when we see some View in SwiftUI it actually means; “this will send some kind of view to edit, but I don’t want to write down exactly what it is - figure it out yourself (because if I wanted to write it down I would have to write a really long type)”
How to Create and Use Swift Extension? #
Extension allows us to add functionality to any type, whether we created it, someone else created it, or even one of Apple’s own types.
To examine the Extension, let’s use the trimmingCharacters(in:) method that works on Strings. This method can remove alphanumeric characters, decimal numbers, spaces, etc. from the beginning or end of a String.
For example, here we have a String with spaces on both sides;
var quote = " The truth is rarely pure and never simple "Here’s how we can trim the spaces on both sides of the quote String;
let trimmed = quote.trimmingCharacters(in: .whitespacesAndNewlines)The .whitespacesAndNewlines value comes from Apple’s Foundation API.
Calling trimmingCharacters(in:) every time is a bit wordy, so let’s write an extension to make it shorter;
extension String {
    func trimmed() -> String {
        self.trimmingCharacters(in: .whitespacesAndNewlines)
    }
}
Let’s analyze the code above a bit;
- We start with the keyword
extensionwhich says that we want to add functionality to an existing type. - Which type? Here we want to add functionality to
String. - Then we open our
{ }brackets and start the functionality we want to add to the String. - We add the
trimmed()method, which returns a new String. - Inside the method, we call the same method as before,
trimmingCharacters(in:)which returns the result. - Notice how we use
self, which automatically refers to the current string. This is possible because we are now in a String extension.
Now, everywhere we want to remove spaces we can write the following.
let trimmed = quote.trimmed()Advantages of Extension #
- When we type
qoute.Xcode gives us suggestions, when we add our function as an extension, our function is shown among these suggestions. - Using global functions makes our code messy, difficult to organize and track. On the other hand, extensions are grouped by the type of data they extend.
- Since extension methods are part of the original type, they have full access to the type’s internal data. Thus, properties and methods with
privateaccess contorol can be used.
It also makes it easier to modify extension values in place, that is, to modify a value directly instead of returning a new value.
For example, earlier we wrote the trimmed() method that removes whitespace and returns a new String, but if we want to change the String directly we can add it to the extension.
mutating func trim() {
    self = self.trimmed()
}*Note: Since String is a struct and we are writing extensions in String, we should mark our method as mutating.
Since the string quote is created as a variable (var), we can delete its blanks as follows;
quote.trim()When we return a new value we use the name trimmed(), but when we modify the String directly we use trim(). This is part of the Swift design guidelines: If you are returning a new value instead of modifying it, like reversed(), we should use word endings like ed or ing.
We can also use extension to add properties to types, but there is a rule. These properties should only be computed properties, not stored properties. This is because the new stored properties will affect the actual size of the data type. If we add a bunch of stored properties to an Int, the Int number in each place has to take up more memory, which can cause a lot of unforeseen problems.
But we can still do a lot using computed property. For example, we can count the number of lines in a multi-line String. We can get this number of lines by using a computed property called lines.
extension String {
    var lines: [String] {
        self.components(separatedBy: .newlines)
    }
}
After applying the above extension, we can read the lines property of any String as follows.
let lyrics = """
But I keep cruising
Can't stop, won't stop moving
It's like I got this music in my mind
Saying it's gonna be alright
"""

print(lyrics.lines.count)

//OUTPUT:
//----------------------------------------
// 4
Struct Extension and Initializer #
We mentioned that Structs automatically have a memberwise initializer. Swift was creating the initializer for us by looking at the properties of the Struct.
struct Book {
    let title: String
    let pageCount: Int
    let readingHours: Int
}

let lotr = Book(title: "Lord of the Rings", pageCount: 1178, readingHours: 24)
If we create a custom initializer, Swift will disable the use of the automatically generated memberwise initializer.
struct Book {
let title: String
let pageCount: Int
let readingHours: Int
init(title: String, pageCount: Int) {
self.title = title
self.pageCount = pageCount
self.readingHours = pageCount / 50
}
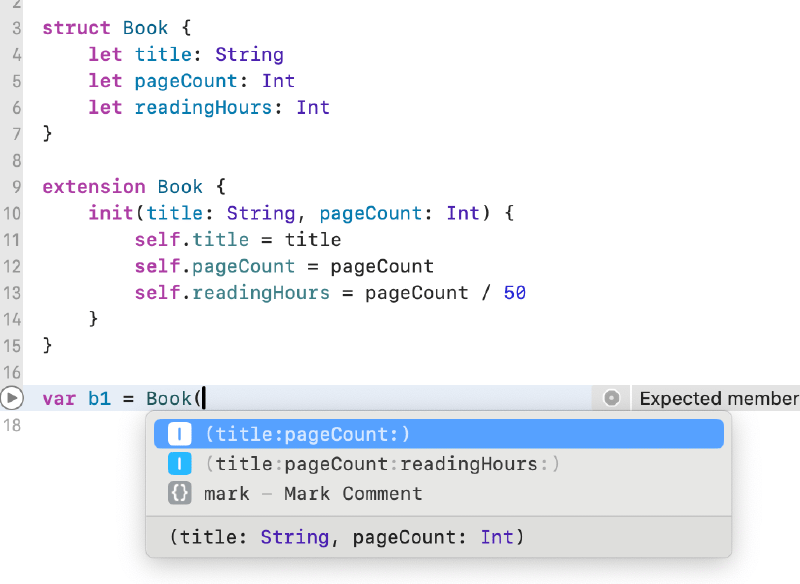
}But in some cases we may want to use both memberwise initializer and custom initializer together. In this case, we can do this by using the extension. If we use the custom initializer as an extension and create it there instead of where we first defined the Struct, we get both the custom and memberwise initializer.
extension Book {
    init(title: String, pageCount: Int) {
        self.title = title
        self.pageCount = pageCount
        self.readingHours = pageCount / 50
    }
}
How to Create and Use a Protocol Extension #
Protocols allow us to create conventions that must be followed, extensions allow us to add functionality to existing types. What if we could write protocols and extensions?
With protocol extension, we can extend the protocol to add methods to be implemented so that all types that adopt the protocol can have these methods.
Let’s start with an example;
let guests = ["Mario", "Luigi", "Peach"]

if guests.isEmpty == false {
    print("Guest count: \(guests.count)")
}
Some people prefer to use the ! operator instead of the above code.
if !guests.isEmpty {
    print("Guest count: \(guests.count)")
}
We can use extension instead of these two approaches.
extension Array {
    var isNotEmpty: Bool {
        isEmpty == false
    }
}
Now we can write the following code, which is easier to understand.
if guests.isNotEmpty {
    print("Guest count: \(guests.count)")
}
But we can do better. We only added isNotEmpty to Array, but what about Set and Dictionary? There is a better solution than repeating ourselves and writing this extension everywhere. Array, Set and Dictionary all conform to a built-in protocol called Collection and through this protocol they have methods like contains(), sorted(), reversed(), etc.
Collection also contains the isEmpty property. So if we write an extension on Collection, we can still access the isEmpty property.
extension Collection {
    var isNotEmpty: Bool {
        isEmpty == false
    }
}
Thanks to the extension above, we can use isNotEmpty on Array, Set and Dictionary as well as other types that conform to the Collection protocol.
By adding extensions to the protocol, we can add functionality to any construct that adopts the protocol. This actually allows us to use a technique that Apple calls protocol-oriented programming.
For example, suppose I have a protocol like this;
//PROTOCOL !
protocol Person {
    var name: String { get }
    func sayHello()
}
All types that conform to this protocol must implement the sayHello() method. But we can add the default implementation of this method as follows.
//EXTENSION !
extension Person {
    func sayHello() {
        print("Hi, I'm \(name)")
    }
}
Now all types that conform to the protocol can add the sayHello() method if they want to, but it is not mandatory. They can always rely on the method provided in the protocol extension.
So we can create an employee without the sayHello() method.
struct Employee: Person {
    let name: String
}
Since the Employee struct conforms to the Person protocol, we can easily use the default sayHello() method.
let taylor = Employee(name: "Taylor Swift")
taylor.sayHello()

//OUTPUT:
//----------------------------------------
// Hi, I'm Taylor Swift
100 Days of SwiftUI Checkpoint - 8 #
You can also read this article in Turkish.
Bu yazıyı Türkçe olarak da okuyabilirsiniz.


